Cerita-cerita yang tidak bisa saya ceritakan . Penyaluran hobi saya juga . hhe enjoy yeahh . seLamat membaca . :)
"saat saya menjadi gila akan tulisan . . ." :D
Rabu, 25 April 2012
Rabu, 08 Februari 2012
Kritikan itu Indah
Saya ingin sedikit bercerita tentang kritikan yang saya terima beberapa minggu yang lalu. Ini hanya sekedar cerita saja ya .. Mungkin teman-teman pernah mengalaminya ..
Ngomong-ngomong soal kritik, kata mbak wiki :
Kritik adalah masalah penganalisaan dan pengevaluasian sesuatu dengan tujuan untuk meningkatkan pemahaman, memperluas apresiasi, atau membantu memperbaiki pekerjaan.
Itu untuk kritikan Sastra dan Seni. Tapi apa beda nya jika manusia yang dikritik. Contohnya saja saya, saya dikritik seperti ini :
Kata nya, Saya jelek, jalan nya seperti orang cacat, tidak pernah memakai bedak, dll.
Ataukah itu termasuk kritikan atau ejekan. Bahkan jika itu disampaikan pada orang lain, bukan pada kita sendiri. Apakah itu sebuah penghinaan, cibiran, meremehkan, atau memang sebuah kritikan. Saya tidak ingin menyebutnya sebagai ejekan atau penghinaan keadaan fisik saya, tapi saya anggap itu sebuah kritikan.
Waktu itu Saya marah dengan kritikan itu, kritikan secara fisik yang sedikit menggores. Saya sedikit tidak terima karena peng-kritik mengatakannya pada pacar saya, kenapa tidak kepada saya langsung, itu lebih etis dilakukan. Bahkan karena kritikan itu saya jadi berpikir, mungkin benar, bahwa semua orang memandang sebelah mata pada orang yang berfisik buruk.
Dan kembali lagi, karena kata-kata ini, "kamu itu orang nya ga pernah bersyukur ya !". Jadi, apa peduli orang tentang fisik saya, saya bersyukur saya jelek, saya bersyukur jalan saya seperti orang cacat, saya tidak pernah pakai bedak dll. Saya bersyukur orang-orang terdekat menerima saya apa adanya. Tidak karena fisik, materi apapun itu.
Saya bersyukur karena saya dicintai apa adanya. Tidak ada apa nya..
Nah, hati saya sedikit dingin, ketika panas di siram es oleh kata-kata nya Om Mario Teguh :
Adikku yang muda dan sering dirisaukan oleh kritik orang lain, dengarlah ini …
Engkau tidak akan dikritik JIKA engkau orang biasa yang tidak mencapai
hasil yang melebihi hasil dari jiwa-jiwa yang belum damai di luar sana
itu.
Hanya karena engkau lebih dari mereka, mereka kehilangan kendali diri
dan tak malu mengumumkan perasaan tertinggal-nya dengan mencoba
merendahkanmu.
...
Orang yang gemar mengkritik dan merendahkan orang lain, sering tidak
menyadari bahwa dia MENGKRITIK DARI TEMPAT YANG LEBIH RENDAH.
Engkau yang muda, ingatlah bahwa perjalananmu masih panjang.
Apa pun kritik mereka, tetaplah berfokus belajar dan bekerja untuk menjadikan dirimu lebih baik dan lebih mampu.
Bersabarlah.
Tetaplah setia kepada kebenaran yang menjadikanmu pemulia hati sesama.
Mario Teguh – Loving you as always
Jadi, pelajaran yang saya ambil dari kritikan fisik yang saya dapatkan adalah selalu bersyukur atas apa yang saya punya. Buktikan dengan prestasi, tidak ada yang abadi didunia ini. Kecantikan akan hilang dimakan usia. Dan saya, ingin mempercantik hati saya, bukan fisik saya. Kecantikan hati banyak dibeli, kecantikan fisik harus banyak membeli. :)
Bukan *Berkhayal* lagi
http://monandien.blogspot.com/2010/09/berkhayal.html
Baru saja saya membaca lagi catatan saya diatas. Zaman sekarang mungkin namanya "galau" ya .. hehe
Lucu rasanya bisa teringat lagi pikiran saya waktu menulisnya. Marah, kesal, benci, tidak terima, bahkan ingin membunuh orang-orang yang dengan sombongnya merasa dia sempurna meremehkan saya. Tapi seharusnya tidak begitu ya .. Seharusnya saya Instropeksi diri saja, toh tidak akan mengubah kadaan saya waktu itu.
Kalau dipikir-pikir waktu itu saya tidak cukup bersyukur dengan apa yang saya punya. Selalu ingin punya apa yang orang lain punya. Ya .. setidak nya saya sedikit bersyukur dengan banyaknya teman yang saya punya.
Jujur saja beberapa minggu yang lalu saya merasakan hal yang sama untuk kedua kali nya. Bahkan saya sampai meng-update status di akun facebook saya dengan kata-kata yang kasar. Seolah ingin si orang itu membacanya, seolah saya tidak peduli dengan apa yang dia katakan, seolah dia hanya debu yang harus dibersihkan dipikiransaya. Tapi, kembali lagi, saya harus bersyukur dengan apa yang saya punya, Alhamdulillahhirobil"alamin, terimakasih ya Robb . . Kehidupan ini sungguh sangat sempurna untukku ..
Sebetulnya saya sedikit menyesal meluapkan kekesalan saya dengan mengumbar-ngumbarnya di akun Facebook saya. Saya merasa idak seharusnya saya seperti itu, dan pada akhirnya akan membenihkan rasa dendam dihati saya pada orang itu. Saya tidak merasa dendam, hanya saja saya tidak suka caranya mngkritik saya. Buka saya tidak menerima kritikan nya. Tapi setidaknya dia bisa memilih cara yang lebih etis untuk menyampaikannya.
Tapi, sekarang saya mengerti, sejak dulu saya mengerti, ada orang yang pro dan kontra. Keberagaman sifat dan prilaku manusia tidak seharusnya dipandang sebelah mata.
Alhamdulillah, ketika saya menulis ini, pikiran saya dalam keadaan tenang, tidak seperti waktu itu, begitu gusar dan berantakan, penuh dengan emosi.
Ketika menulis ini, saya teringat kata-kata nya, seperti ini, "kamu itu orang nya ga pernah bersyukur ya !". Mendengar kata-kata itu saya jadi mengubah pola pikir saya. mungkin ini yang saya rasakan, selalu galau, selalu mengeluh karena saya tidak bersyukur.
Ya.. memang benar, sepertinya memang begitu. kali ini, apapun keadaan nya, apapun yang saya alami, apapun yang saya dapatkan, dan apapun yang saya punya, saya akan berusaha untuk terus bersyukur...
Rabu, 25 Januari 2012
Ringkasan Tentang Penjurusan
Hematologi
Anemia defisiensi zat besi biasanya
tidak diketahui dan dapat menyertai
anemia bentuk lain, missal β-talasemia yang muncul pada awal kehidupan.
Penyapihan yang terlambat dan ketergantungan terhadap susu akan memperpanjang
defisiensi zat besi.
Timbulnya anemia secara mendadak
jarang terjadi pada anak-anak, tetapi merupakan kelanjutan dari kehilangan
darah, hemolisis, leukemia akut, dan aplasia sumsum tulang.
Prevalensi tipe anemia tertentu
berhubungan dengan umur :
·
Lahir sampai 1 bulan
·
1-3 bulan – secara fisiologis ada hubungannya
dengan prematurasi. Sepsis dan perdarahan
juga ikut berperan.
·
3-18 bulan – secara fisiologis terutama terjadi
pada bayi premature atau bayi kembar; nutrisi (karena penyapihan yang
terlambat); anemia congenital (sel sabit, betha-talasemia mayor, sferositosis
herediter, defisiensi G-6-PD dehidrogenase dll.)
·
18 bulan smapai 3 tahun – anemia nutrisi dan congenital;
perdarahan; leukemia; aplasia; malabsorpsi; penyakit peradangan kronis.
·
Tiga tahun atau lebih – nutrisi; malabsorpsi; leukemia,dll;
kehilangan darah; penyakit kronis (hepar,ginjal,kolagen); hemolisis (termasuk
sindrom uremik hemolitik).
Darah (Sanguis)Terdiri dari dua komponen:
1. Korpuskuler adalah unsur padat darah yaitu sel-sel darah 4 Eritrosit, Lekosit, Trombosit.
2. Plasma Darah adalah cairan darah.
Fungsi Darah
- Transportasi (sari makanan, oksigen, karbondioksida, sampah dan air)
- Termoregulasi (pengatur suhu tubuh)
- Imunologi (mengandung antibodi tubuh)
- Homeostasis (mengatur keseimbangan zat, pH regulator)
Eritrosit (Sel Darah Merah)
Merupakan bagian utama dari sel darah. Jumlah pada pria dewasa sekitar 5 juta sel/cc darah dan pada wanita sekitar 4 juta sel/cc darah. Berbentuk Bikonkaf, warna merah disebabkan oleh Hemoglobin (Hb) fungsinya adalah untuk mengikat Oksigen. Kadar 1 Hb inilah yang dijadikan patokan dalain menentukan penyakit Anemia.
Eritrosit berusia sekitar 120 hari. Sel yang telah tua dihancurkan di Limpa 4. Hemoglobin dirombak kemudian dijadikan pigmen Bilirubin (pigmen empedu).
Leukosit (Sel Darah Putih)
Jumlah sel pada orang dewasa berkisar antara 6000 – 9000 sel/cc darah. Fungsi utama dari sel tersebut adalah untuk Fagosit (pemakan) bibit penyakit/ benda asing yang masuk ke dalam tubuh. Maka jumlah sel tersebut bergantung dari bibit penyakit/benda asing yang masuk tubuh.
Peningkatan jumlah lekosit merupakan petunjuk adanya infeksi Þ misalnya radang paru-paru.
Lekopeni - Berkurangnya jumlah lekosit sampai di bawah 6000 sel/cc darah.
Lekositosis – Bertambahnya jumlah lekosit melebihi normal (di atas 9000 sel/cc darah).
Fungsi fagosit sel darah tersebut terkadang harus mencapai benda asing/kuman jauh di luar pembuluh darah. Kemampuan lekosit untuk menembus dinding pembuluh darah (kapiler) untuk mencapai daerah tertentu disebut Diapedesis.
Gerakan lekosit mirip dengan amoeba Þ Gerak Amuboid.
Jenis Lekosit
Granulosit Þ Lekosit yang di dalam sitoplasmanya memiliki butir-butir kasar (granula).
Jenisnya adalah eosinofil, basofil dan netrofil.
Agranulosit Þ Lekosit yang sitoplasmanya tidak memiliki granola. Jenisnya adalah limfosit dan monosit.
• Eosinofil Þ mengandung granola berwama merah (Warna Eosin) disebut juga Asidofil. Berfungsi pada reaksi alergi (terutama infeksi cacing).
• Basofil Þ mengandung granula berwarna biru (Warna Basa). Berfungsi pada reaksi alergi.
• Netrofil Þ (ada dua jenis sel yaitu Netrofil Batang dan Netrofil Segmen). Disebut juga sebagai sel-sel PMN (Poly Morpho Nuclear). Berfungsi sebagai fagosit.
• Limfosit Þ (ada dua jenis sel yaitu sel T dan sel B). Keduanya berfungsi untuk menyelenggarakan imunitas (kekebalan) tubuh.
sel T4 Þ imunitas seluler
sel B4 Þ imunitas humoral
• Monosit Þ merupakan lekosit dengan ukuran paling besar
Trombosit (KEPING DARAH)
Disebut pula sel darah pembeku. Jumlah sel pada orang dewasa sekitar 200.000 – 500.000 sel/cc. Di dalam trombosit terdapat banyak sekali faktor pembeku (Hemostasis) antara lain adalah Faktor VIII (Anti Haemophilic Factor) Þ Jika seseorang secara genetis trombositnya tidak mengandung faktor tersebut, maka orang tersebut menderita Hemofili.
Proses Pembekuan Darah
Trombosit yang menyentuh permukaan yang kasar akan pecah dan mengeluarkan enzim Trombokinase (Tromboplastin). Prosesnya adalah sebagai berikut;
TROMBOSIT pecah Þ TROMBOPLASTIN
ion Ca
PROTROMBIN Þ TROMBIN
Vitamin K
FIBRINOGEN Þ FIBRIN
Pada masa embrio (janin) sel-sel darah dibuat di dalam Limpa dan Hati (extra medullary haemopoiesis).
Setelah embrio sudah cukup usia, fungsi itu diambil alih oleh Sumsum Tulang.
Plasma Darah
Terdiri dari air dan protein darah Þ Albumin, Globulin dan Fibrinogen. Cairan yang tidak mengandung unsur fibrinogen disebut Serum Darah.
Protein dalam serum inilah yang bertindak sebagai Antibodi terhadap adanya benda asing (Antigen).
Zat antibodi adalah senyawa Gama Þ Globulin.
Tiap antibodi bersifat spesifik terhadap antigen dan reaksinya bermacam-macam.
- Antibodi yang dapat menggumpalkan antigen Þ Presipitin.
- Antibodi yang dapat menguraikan antigen Þ Lisin.
- Antibodi yang dapat menawarkan racun Þ Antitoksin.
Contohnya adalah sifat golongan darah (Blood Groups). Yang umum adalah penentuan cara ABO (ABO System) Þ oleh Landsteiner.
Aglutinogen = antigen ; aglutinin = antibodi
Jika aglutinogen dan aglutinin yang “sesuai” bercampur Þ Reaksi Aglutinasi.
Donor Universal Þ golongan darah yang dapat memberikan darahnya pada semua jenis golongan darah yang lain Þ Golongan Darah O.
Resipien Universal Þ golongan darah yang dapat memberikan darah dari semua jcnis golongan darah yang lain Þ Golongan Darah AB.
Sistem golongan darah yang lain adalah Sistem Rhesus yang dikemukakan oleh Landsteiner.
Nama Rhesus diambil dari sejenis kera Macacca rhesus (di India). Prinsipnya adalah terdapatnya antibodi terhadap antigen D (anti-D).
Sistem rhesus mengenal dua jenis golongan darah yaitu:
1. Rhesus POSITIF
2. Rhesus NEGATIF (diturunkan secara genetis, Rh+ dominan terhadap Rh-)
Eritroblastosis Foetalis adalah kelainan pada bayi di mana telah terjadi ketidaksesuaian faktor rhesus (bayi Rh + dan ibu Rh -). Gejala penyakit ini adalah Ikterik Þ ditemukan oleh Levine.
Pertolongan pada bayi tersebut adalah dengan cara Transfusi Eksanguinasi (Exchange Transfussion).
Jantung
Terdiri dari tiga lapisan
1. Perikardium (lapisan luar)
2. Miokardium (lapisan tengah/otot jantung)
3. Endokardium (lapisan dalam)
Jantung terdiri dari 4 ruang
1. Atrium Sinister (Serambi Kiri)
2. Atrium Dekster (Serambi Kanan)
3. Ventrikel Sinister (Bilik Kiri)
4. Ventrikel Dekater (Bilik Kanan)
Antara Atrium Sinister (Serambi Kiri) dengan Ventrikel Sinister (Bilik Kiri) terdapat katup dua daun (Valvula Bicuspidalis), sedangkan antara Atrium Dekster (Serambi Kanan) dengan Ventrikel Dekster (Bilik Kanan) dihubungkan katup tiga daun (Valvula Tricuspidalis). Jantung mendapat makanan (oksigenasi) melalui pembuluh Arteri Koronaria.
Peredaran darah terbagi dua bagian yang bekerja sekaligus yaitu :
1. Peredaran darah Pulmona/Peredaran darah pendek (jantung – paru-paru – jantung).
2. Peredaran darah Sistemik/Peredaran darah panjang (jantung – seluruh tubuh – jantung)
Denyut jatung terbagi dua fase yaitu
1. Fase Sistolik (kontraksi).
2. Fase Diastolik (relaksasi).
Pembuluh Darah
Terdiri dari :
1. Pembuluh darah yang meninggalkan jantung Þ Arteri terdiri dari Aorta, Arteri, Arteriol.
2. Pembuluh darah yang menuju jantung Þ Vena terdiri dari Vena Kava, Vena, Venula.
3. Pembuluh antara arteri dan vena Þ Kapiler.
Daftar Pustaka :
Vade-Mecum Pediatri (Buku Kedokteran)
Edisi 13
Editor : Jack Ensley
Microsoft Excel
Microsoft Excel is an electronic spreadsheet. You can use it to
organize your data into rows and columns. You can also use it to
perform mathematical calculations quickly. This tutorial teaches
Microsoft Excel basics. Although knowledge of how to navigate in a
Windows environment is helpful, this tutorial was created for the
computer novice.
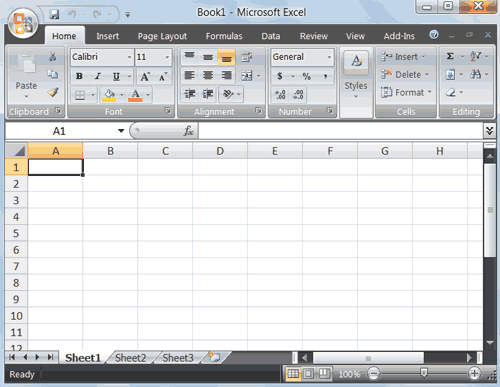
This lesson will introduce you to the Excel window. You use the window to interact with Excel. To begin this lesson, start Microsoft Excel 2007. The Microsoft Excel window appears and your screen looks similar to the one shown here.
 Note:
Your screen will probably not look exactly like the screen shown. In
Excel 2007, how a window displays depends on the size of your window,
the size of your monitor, and the resolution to which your monitor is
set. Resolution determines how much information your computer monitor
can display. If you use a low resolution, less information fits on your
screen, but the size of your text and images are larger. If you use a
high resolution, more information fits on your screen, but the size of
the text and images are smaller. Also, settings in Excel 2007, Windows
Vista, and Windows XP allow you to change the color and style of your
windows.
In the upper-left corner of the Excel 2007 window is the Microsoft Office button. When you click the button, a menu
appears. You can use the menu to create a new file, open an existing
file, save a file, and perform many other tasks.
Next
to the Microsoft Office button is the Quick Access toolbar. The Quick
Access toolbar gives you with access to commands you frequently use. By
default, Save, Undo, and Redo appear on the Quick Access toolbar. You
can use Save to save your file, Undo to roll back an action you have
taken, and Redo to reapply an action you have rolled back.
Next to the Quick Access toolbar is the Title bar. On the Title bar, Microsoft Excel displays the name of the workbook
you are currently using. At the top of the Excel window, you should see "Microsoft
Excel - Book1" or a similar name.
You
use commands to tell Microsoft Excel what to do. In Microsoft Excel
2007, you use the Ribbon to issue commands. The Ribbon is located near
the top of the Excel window, below the Quick Access toolbar. At the top
of the Ribbon are several tabs; clicking a tab displays several related
command groups. Within each group are related command buttons. You
click buttons to issue commands or to access menus and dialog boxes.
You may also find a dialog box launcher in the bottom-right corner of a
group. When you click the dialog box launcher, a dialog box makes
additional commands available.
 Microsoft Excel consists of worksheets.
Each worksheet contains columns and rows. The columns are lettered A to
Z and then continuing with AA, AB, AC and so on; the rows are numbered
1 to 1,048,576. The number of columns and rows you can have in a
worksheet is limited by your computer memory and your system resources.
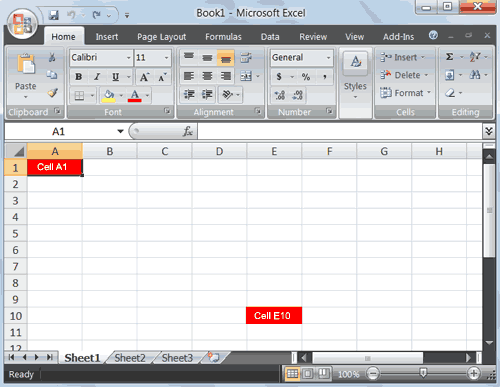
The combination of a column coordinate and a row coordinate make up a cell address. For example, the cell located in the upper-left corner of the worksheet is cell A1, meaning column A, row 1. Cell E10 is located under column E on row 10. You enter your data into the cells on the worksheet.

Formula Bar
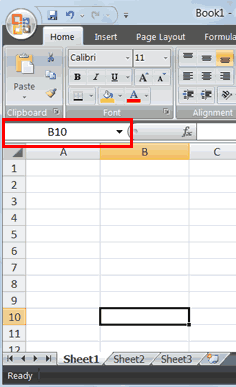
If the Formula bar is turned on, the cell address of the cell you are in displays in the Name
box which is located on the left side of the Formula bar. Cell entries display on the
right side of the Formula bar. If you do not see the Formula bar in your window, perform the following steps:
 If you wish to perform a function on a group of cells, you must first
select those cells by highlighting them. The exercises that follow teach you how to select.
http://www.baycongroup.com/excel2007/01_excel.htm
6.46 25 Januari 2012
This lesson will introduce you to the Excel window. You use the window to interact with Excel. To begin this lesson, start Microsoft Excel 2007. The Microsoft Excel window appears and your screen looks similar to the one shown here.

The Microsoft Office Button
The Quick Access Toolbar
The Title Bar
The Ribbon
Worksheets

The combination of a column coordinate and a row coordinate make up a cell address. For example, the cell located in the upper-left corner of the worksheet is cell A1, meaning column A, row 1. Cell E10 is located under column E on row 10. You enter your data into the cells on the worksheet.
The Formula Bar
Formula Bar
- Choose the View tab.
- Click Formula Bar in the Show/Hide group. The Formula bar appears.
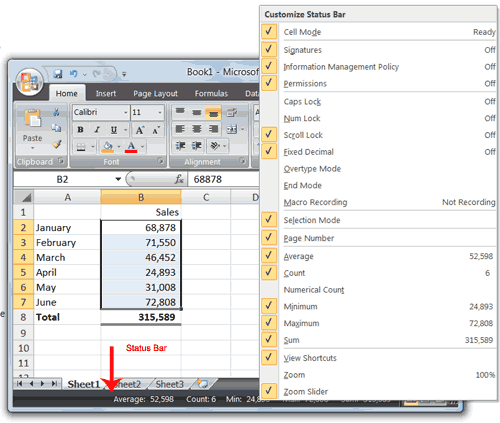
The Status Bar

The
Status bar appears at the very bottom of the Excel window and provides
such information as the sum, average, minimum, and maximum value of
selected numbers. You can change what displays on the Status bar by
right-clicking on the Status bar and selecting the options you want
from the Customize Status Bar menu. You click a menu item to select it.
You click it again to deselect it. A check mark next to an item means
the item is selected.
Move Around a Worksheet
By using the arrow keys, you can move around your worksheet. You can use the down arrow key to move downward one cell at a time. You can use the up arrow key to move upward one cell at a time. You can use the Tab key to move across the page to the right, one cell at a time. You can hold down the Shift key and then press the Tab key to move to the left, one cell at a time. You can use the right and left arrow keys to move right or left one cell at a time. The Page Up and Page Down keys move up and down one page at a time. If you hold down the Ctrl key and then press the Home key, you move to the beginning of the worksheet.EXERCISE 1
Move Around the Worksheet
The Down Arrow Key
- Press the down arrow key several times. Note that the cursor moves downward one cell at a time.
The Up Arrow Key
- Press the up arrow key several times. Note that the cursor moves upward one cell at a time.
The Tab Key
- Move to cell A1.
- Press the Tab key several times. Note that the cursor moves to the right one cell at a time.
The Shift+Tab Keys
- Hold down the Shift key and then press Tab. Note that the cursor moves to the left one cell at a time.
The Right and Left Arrow Keys
- Press the right arrow key several times. Note that the cursor moves to the right.
- Press the left arrow key several times. Note that the cursor moves to the left.
Page Up and Page Down
- Press the Page Down key. Note that the cursor moves down one page.
- Press the Page Up key. Note that the cursor moves up one page.
The Ctrl-Home Key
- Move the cursor to column J.
- Stay in column J and move the cursor to row 20.
- Hold down the Ctrl key while you press the Home key. Excel moves to cell A1.
Go To Cells Quickly
The following are shortcuts for moving quickly from one cell in a worksheet to a cell in a different part of the worksheet.EXERCISE 2
Go to -- F5
The F5 function key is the "Go To" key. If you press the F5 key, you are prompted for the cell to which you wish to go. Enter the cell address, and the cursor jumps to that cell.- Press F5. The Go To dialog box opens.
- Type J3 in the Reference field.
- Press Enter. Excel moves to cell J3.
Go to -- Ctrl+G
You can also use Ctrl+G to go to a specific cell.- Hold down the Ctrl key while you press "g" (Ctrl+g). The Go To dialog box opens.
- Type C4 in the Reference field.
- Press Enter. Excel moves to cell C4.
The Name Box
You can also use the Name box to go to a specific cell. Just type the cell you want to go to in the Name box and then press Enter.
- Type B10 in the Name box.
- Press Enter. Excel moves to cell B10.
Select Cells

EXERCISE 3
Select Cells
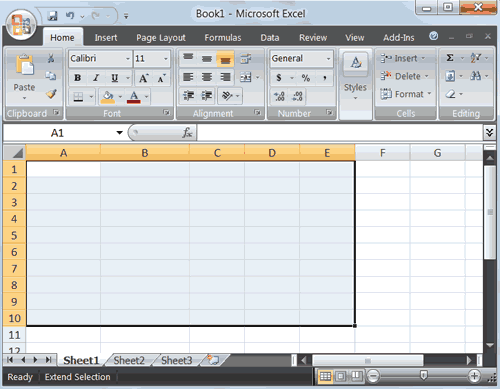
To select cells A1 to E1:- Go to cell A1.
- Press the F8 key. This anchors the cursor.
- Note that "Extend Selection" appears on the Status bar in the lower-left corner of the window. You are in the Extend mode.
- Click in cell E7. Excel highlights cells A1 to E7.
- Press Esc and click anywhere on the worksheet to clear the highlighting.
Alternative Method: Select Cells by Dragging
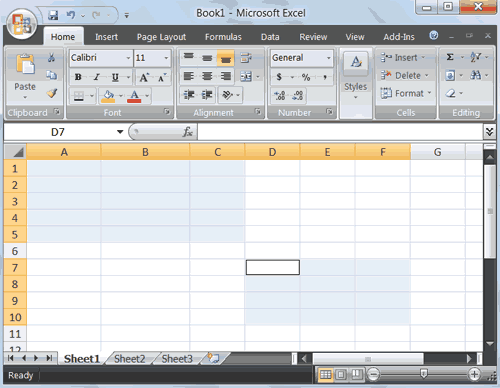
You can also select an area by holding down the left mouse button and dragging the mouse over the area. In addition, you can select noncontiguous areas of the worksheet by doing the following:
- Go to cell A1.
- Hold down the Ctrl key. You won't release it until step 9. Holding down the Ctrl key enables you to select noncontiguous areas of the worksheet.
- Press the left mouse button.
- While holding down the left mouse button, use the mouse to move from cell A1 to C5.
- Continue to hold down the Ctrl key, but release the left mouse button.
- Using the mouse, place the cursor in cell D7.
- Press the left mouse button.
- While holding down the left mouse button, move to cell F10. Release the left mouse button.
- Release the Ctrl key. Cells A1 to C5 and cells D7 to F10 are selected.
- Press Esc and click anywhere on the worksheet to remove the highlighting.
Enter Data
In this section, you will learn how to enter data into your worksheet. First, place the cursor in the cell in which you want to start entering data. Type some data, and then press Enter. If you need to delete, press the Backspace key to delete one character at a time.EXERCISE 4
Enter Data

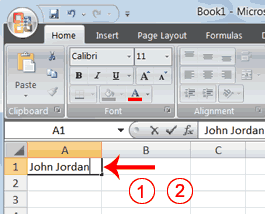
- Place the cursor in cell A1.
- Type John Jordan. Do not press Enter at this time.

Delete Data
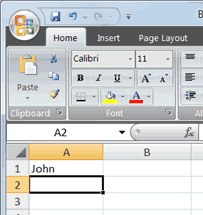
The Backspace key erases one character at a time.- Press the Backspace key until Jordan is erased.
- Press Enter. The name "John" appears in cell A1.
Edit a Cell
After you enter data into a cell, you can edit the data by pressing F2 while you are in the cell you wish to edit.
EXERCISE 5
Edit a Cell
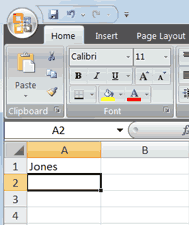
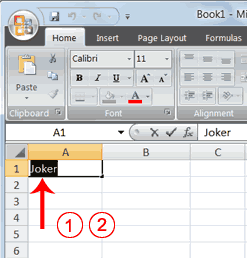
Change "John" to "Jones."- Move to cell A1.
- Press F2.
- Use the Backspace key to delete the "n" and the "h."
- Type nes.
- Press Enter.
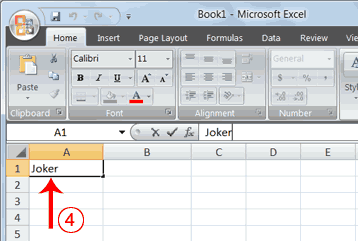
Alternate Method: Editing a Cell by Using the Formula Bar
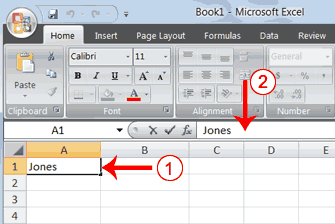
You can also edit the cell by using the Formula bar. You change "Jones" to "Joker" in the following exercise.
- Move the cursor to cell A1.
- Click in the formula area of the Formula bar.

- Use the backspace key to erase the "s," "e," and "n."
- Type ker.
- Press Enter.
Alternate Method: Edit a Cell by Double-Clicking in the Cell
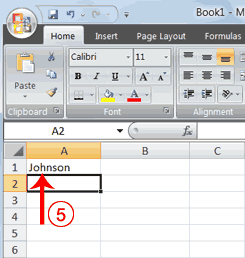
You can change "Joker" to "Johnson" as follows:
- Move to cell A1.
- Double-click in cell A1.
- Press the End key. Your cursor is now at the end of your text.

- Use the Backspace key to erase "r," "e," and "k."
- Type hnson.
- Press Enter.
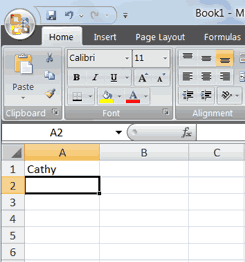
Change a Cell Entry
Typing in a cell replaces the old cell entry with the new information you type.- Move the cursor to cell A1.
- Type Cathy.
- Press Enter. The name "Cathy" replaces "Johnson."

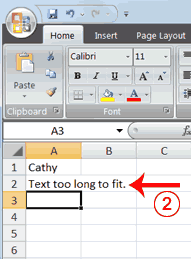
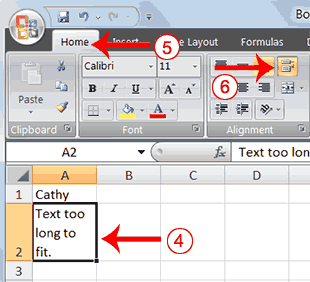
Wrap Text
When you type text that is too long to fit in the cell, the text overlaps the next cell. If you do not want it to overlap the next cell, you can wrap the text.EXERCISE 6
Wrap Text

- Move to cell A2.
- Type Text too long to fit.
- Press Enter.

- Return to cell A2.
- Choose the Home tab.
- Click the Wrap Text button
 . Excel wraps the text in the cell.
Delete a Cell Entry
To delete an entry in a cell or a group of cells, you place the cursor in the cell or select the group of cells and press Delete.EXERCISE 7
Delete a Cell Entry
- Select cells A1 to A2.
- Press the Delete key.
Save a File
This is the end of Lesson1. To save your file:- Click the Office button. A menu appears.
- Click Save. The Save As dialog box appears.
- Go to the directory in which you want to save your file.
- Type Lesson1 in the File Name field.
- Click Save. Excel saves your file.
Close Excel
Close Microsoft Excel.- Click the Office button. A menu appears.
- Click Close. Excel closes.
http://www.baycongroup.com/excel2007/01_excel.htm
6.46 25 Januari 2012
Microsoft Word
Bagi
pengguna Microsoft Word XP atau Office 2003 mungkin sedikit kelabakan
jika suatu saat harus menggunakan Office 2007 karena file yang harus
dibuka menggunakan format .docx. Mulai mencoba-coba menu-menu yang
ada. Mulai dari Home, Insert, Page Layout, References Review ataupun View.
Saya sendiri pernah suatu ketika karena mendapat file dari temen dan
tugas saya hanya memberi nomor halaman, saya harus pusing tujuh
keliling sebelum akhirnya mendapatkan format yang saya inginkan.
Microsoft Office 2007 sebenarnya dirancang untuk memudahkan user, Microsoft Word (MS Word) merupakan program untuk mengolah kata. Program
ini bisa digunakan untuk menulis dokumen misalnya karya tulis, skripsi,
novel, dan sebagainya. Selain menulis dokumen, MS Word juga dapat
digunakan untuk bekerja dengan tabel, menulis teks dengan kreasi,
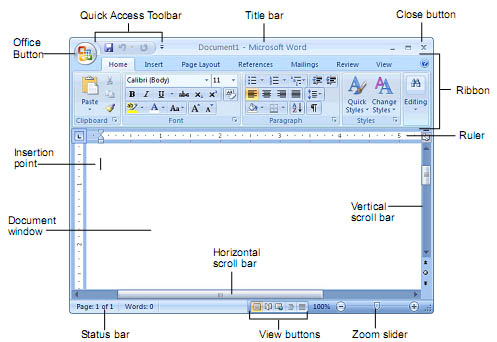
menyisipkan gambar, maupun yang lainnya. Secara default tampilan area kerja program MS Word 2007 terdiri atas dari Bar, Office Button, Quick Access Toolbar, Menu Bar, Ribbon, Ruler, Status Bar, dan View Toolbar. Tampilan area kerja dapat dilihat pada berikut :
Dengan tampilan diatas, tentunya yang kita kenal hanya toolbar formatting. Banyak fitur tambahan yang benar-benar baru.
Title Bar
berisi nama file yang sedang dikerjakan, serta tombol menampilkan, atau
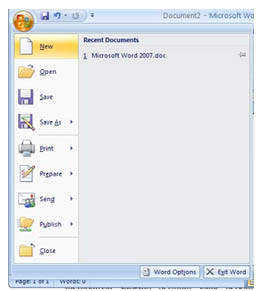
menyembunyikan jendela program, dan menutup program, yaitu tombol Minimize, Maximize/Restore, dan Close. Office Button berisi perintah-perintah yang berkaitan dengan dokumen seperti membuat dokumen baru (New), membuka dokumen (Open), menyimpan dokumen (Save), mencetak dokumen (Print), dan sebagainya.
- Quick Access Toolbar berisi tombol-tombol yang berfungsi sebagai alternatif penggunaan perintah yang sering digunakan. Sebagai contoh, tool Open merupakan shortcut dari Office Button>Open, atau tool Save merupakan shortcut dari Office Button>Save.
- Menu Bar berisi serangkaian perintah yang didalamnya terdapat sub-sub perintah sesuai kategorinya. Sebagai contoh, pada menu Home terdapat submenu Clipboard, Font, Paragraph, Styles, dan Editing yang didalamnya berisi perintah-perintah sesuai kategorinya.
- Ribbon berisi perintah-perintah khusus yang merupakan submenu dari Menu Bar.
- Ruler merupakan kotak pengukuran yang diletakkan secara horizontal, yaitu di atas dokumen, dan secara vertikal, yaitu di sebelah kiri dokumen. Ruler berfungsi untuk mempermudah melakukan pengaturan letak halaman.
- Status Bar adalah baris horizontal yang menampilkan informasi jendela dokumen yang sedang ditampilkan, antara lain.
- Page: menampilkan informasi halaman
- Words: Menampilkan jumlah halaman, kata, huruf (tanpa spasi), huruf (dengan spasi), paragraf, dan baris
View Toolbar berisi pengaturan jenis tampilan dokumen, antara lain:
- Print Layout: memberikan tampilan sesuai hasil yang akan diterima pada saat dicetak (default).
- Full Screen Reading: memberikan tampilan halaman penuh.
- Web Layout: memberikan tampilan sesuai hasil yang ditampilkan di dalam jendela browser.
- Outline: memberikan tampilan sesuai heading di dalam dokumen dan tingkatan di dalam struktur dokumen.
- Draft: memberikan tampilan yang berkelanjutan (menggabungkan seluruh halaman seperti dalam satu gulungan). Tiap halaman dipisahkan oleh garis titik-titik.
Dari tampilan yang ada tentunya terbayang betapa harus membutuhkan
ketelatenan mencoba dan mencoba, try and error sehingga tampilan baru
Word 2007 benar-benar familiar terutama bagi pengguna Word 2003 atau
sebelumnya.
Sedikit trik :
Kabar gembira bagi pengguna Office 2003, shortcut yang ada pada Word
2003 dapat difungsikan dalam Word 2007. Bahkan inisial MenuBar dapat
difungsikan. Contoh menyimpan dengan menggunakan Alt+F+S atau Ctrl+S
Berikut ShortCut yang ada dalam Word 2003 yang bisa digunakan untuk mempercepat bekerja dengan Word 2007
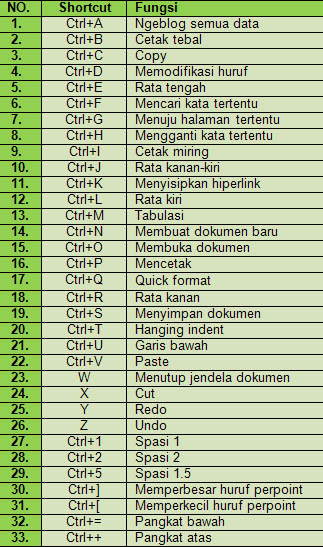
Daftar ShortCut Office 2003
Daftar Pustaka :
http://mahesapandu.wordpress.com/2010/03/04/tutorial-word-2007/
6.36 25 januari 2012
Langganan:
Postingan (Atom)


